
First it is necessary to understand why it is necessary to 'format' a score before you can print it.
When you use a word processor you do not normally need to worry about formatting because the word processor does it for you in real time. Of course, you do have to set up the page size at some stage but you have probably forgotten when or how you ever did that!
With a music score it is a bit different. You will frequently have to adjust the point size and/or the page margins to achieve the best looking score and sometimes you will want to print out individual parts or a piano reduction etc.
Secondly, having taken the trouble to set up a particular format, you do not want to lose it so
VBR saves every format you create within the score itself. This means that you can go back
and print out another copy of that wretched second violin part any time you need to!
Creating a new format
So when your masterpiece is finished, go to the 'Format' menu on the score and click the
'Create new format' item. The following dialog box will open.
At the top you will see a descriptive name for the format you are about to create. This may help you to identify it later.
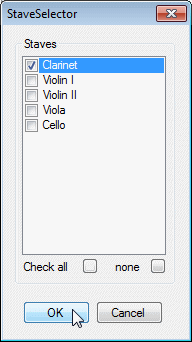
Below the title is a pair of radio buttons which enable you to select whether you want to format the whole score or a selection of parts only. If you choose the latter, click on the yellow arrow to get access to the Stave Selector box where you can check the stave or staves you want to include.
Next you need to check and if necessary adjust the page size and margins you want to use.
Now we come to the point size and the packing factor. A point size of 12 is good for general performance use but it largely determines the maximum number of systems you can fit on a page. Sometimes a reduction of one point can greatly reduce the number of pages required to print a score. To help you select an appropriate size, VBR informs you how many systems will fit on a page.
The packing factor determines how closely spaced the notes will be. Increasing the packing factor packs potentially more notes into each system and can be used to reduce the number of pages needed. Conversely, if there is some empty space at the end of a score on the last page, you can often make good use of it by reducing the packing factor. This will automatically remove bars from systems which are close to being full and pad out the score so that it fills the last page.
(Note that the packing factor only determines the maximum number of notes that are fitted onto a system. VBR naturally fills out every system (except very short ones) so that it fills the whole line - so changing the packing factor does not always change the formatted score.)
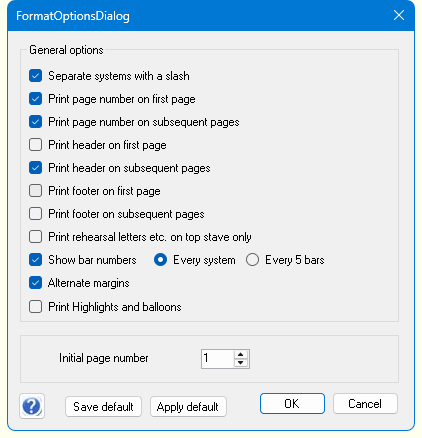
The dialog contains a number of other useful and generally self-explanatory options.
Click 'OK' to create the new format.
The new format opens in a new window. You can, in fact, use this window to edit your score in the usual way but you should be aware that some large scale editing changes will mess up the existing formatting. It is easy, however, to reformat either a single system or the whole score again as described below. It is perfectly possible, however to shift notes up and down, add accidentals, dynamic marks, etc., micro adjust the positions of notes, accidentals and accents (for more details on this see the advanced techniques chapter.) and to drag the spots on hairpins and phrasemarks without upsetting the formatting.
Almost certainly you will have a preferred page layout of your own. By clicking on the 'Save Default'
button you can save the page settings and other options. These will be used whenever you create a new
format. You can bring up these settings at any time by pressing the 'Apply Default' button.
Modifying an existing format
First you must make sure that the format you wish to modify is visible. If it is not, go to the
'View > View other format' menu item where you will find all the existing formats listed.
(Note that the formats are numbered with format 0 being the main 'linear' format.)
Now click the 'Reconstruct this format' item on the 'Format' menu. This brings up tha same dialog box as illustrated above. You will find the 'Apoply default' button quite useful here.
When a score is formatted, VBR uses the size of the stave (as shown by the yellow region of the cursor) to work out where best to place the systems. This is fine except that occasionally you need to place a few notes or other symbols outside this region. This can cause symbols to conflict with symbols in the stave above or below. You can solve this problem either by dragging the systems up or down, or perhaps by repositioning the staves within each system. To do this simply locate the little handles on the green boxes and drag them where you wish.
Sometimes, especially when using a large packing factor, some notes get squashed up a little too much. You can adjust their separation by dragging the slot width handle on the cursor (for more details see the section in the advanced techniques chapter.). The extra width will be added or subtracted from all the following slots as required.
One of the most important thing you can do on the format window is to add and remove bars from various systems. When you have formatted a score there is usually some space wasted at the end. This can usefully be used to ensure that page turns come at useful places or to space out certain passages that are unusually dense. Work from the start of the score; place your cursor in the chosen system then select the menu option 'System > Add bar' or 'System > Remove bar' as required.
The other items on this menu are as follows:
'System > Reformat system...'. This opens the System Editor dialog.
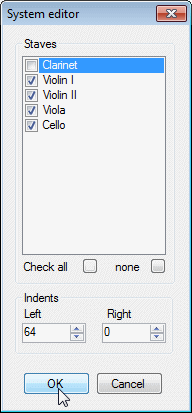
First you to select which staves you want to be printed on this system. In the above example, the clarinet stave has been suppressed - perhaps because it is not playing for these bars. In addition, two Numeric Up/Down boxes are provided which enable you to set the local margins for this system.
'System > Reformat to the end..' is similar to the option above but applies the settings to all the systems from here to the end.
Lastly 'System > Repaginate to the end' is useful when you have moved or compacted some systems and wish to move all the remaining systems up to use the space created.
As you can see, VBR has some extremely useful features in this department which make it
quite unique in the field of low-cost music notation packages.
Adding titles, headers and footers etc.
Now that you have got your score looking the way you want it, you will probably want to give it
a title and other textual elements. Since these things are not restricted to any particular format
you will find the relevant dialog box under 'Score > Headings ...'.
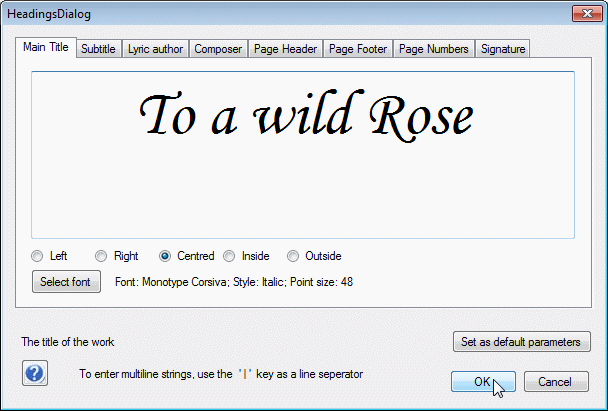
The dialogue has 8 tabs, the first four of which are text fields printed at the head of the score. The default settings are described below but there is no need to adhere to them.
All these options are self-explanatory. As with the page layout you will have your own preferences which can be saved using the 'Save Default' button and retrieved as required.
Printing your score
You will find the option to print your score near the bottom of the 'Format' menu.
A standard dialogue box will open which will allow you to chose what pages to print etc. etc.
If you wish to produce a .pdf file, use Microsoft's 'Print to PDF' printer.
Another method is to use the last option on the 'Format' menu - namely 'Save pages as GIF images'. A standard dialog box will open which you use to browse for (or create) a suitable folder into which one or more images will be stored named Page 1, Page 2 etc. These images can then be imported into any suitable word processor.